 Save
Save I first made chili cheese fries on a rainy Saturday when I had leftover chili in the fridge and a bag of frozen fries I'd forgotten about. What started as a lazy experiment turned into one of those dishes I now crave constantly. The crispy fries soaking up the savory chili, the cheese melting into every crevice—it was messy, indulgent, and absolutely perfect. My partner walked into the kitchen, took one bite, and declared it better than any sports bar version we'd ever had. Now it's our go-to for movie nights and casual gatherings.
I remember making this for a small gathering of friends who showed up unexpectedly one evening. I doubled the batch, piled everything onto a huge platter, and watched it disappear in minutes. Everyone stood around the kitchen island with forks in hand, laughing and reaching over each other for another bite. It became less about the food and more about that easy, unplanned togetherness. That night taught me that the best meals are often the ones you throw together without overthinking.
Ingredients
- Olive oil: A small amount is all you need to start building flavor in the chili base without making it greasy.
- Onion: Finely chopped onion adds sweetness and depth, softening into the background as the chili simmers.
- Garlic cloves: Fresh garlic brings a warm, aromatic punch that dried garlic just cant replicate.
- Ground beef: The foundation of the chili, browning it properly ensures a rich, savory flavor throughout.
- Tomato paste: This concentrated paste deepens the color and adds a slight tang that balances the spices.
- Ground cumin: Cumin gives the chili its earthy, warm undertone that makes it taste like comfort.
- Chili powder: The key spice that gives the dish its name and a gentle heat you can adjust to taste.
- Smoked paprika: A hint of smokiness makes the chili taste like its been simmering for hours.
- Cayenne pepper: Optional, but a pinch adds a subtle kick that wakes up the whole dish.
- Canned chopped tomatoes: They break down into a thick, saucy base that clings to the fries beautifully.
- Kidney beans: These add heartiness and texture, making the chili more filling and satisfying.
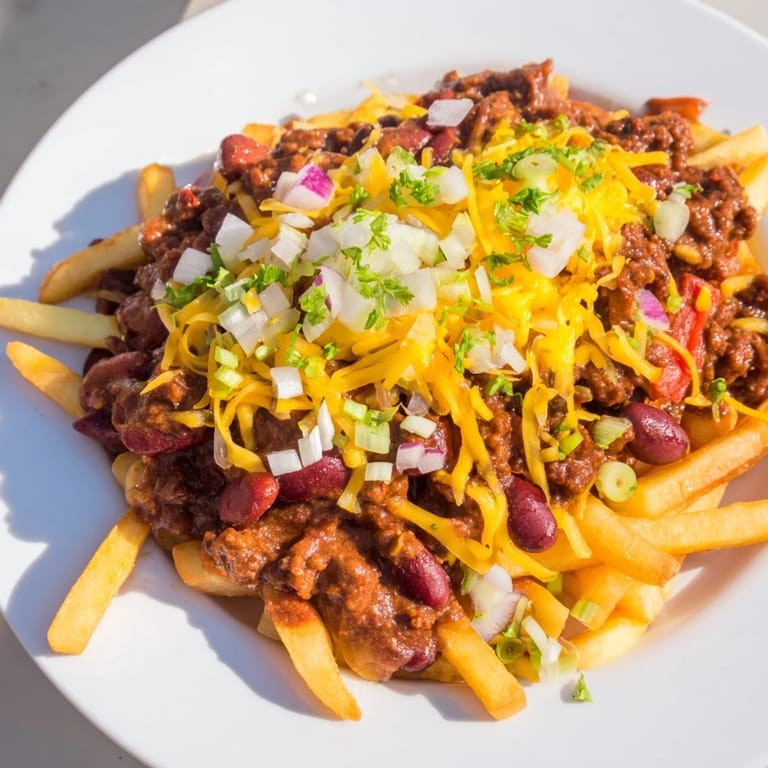
- Frozen French fries: The crispy vessel for all this flavor, and theres no shame in using frozen for convenience.
- Shredded cheddar cheese: It melts into gooey, golden perfection and is non-negotiable for me.
- Spring onions: A fresh, sharp garnish that cuts through the richness with every bite.
- Fresh cilantro or parsley: A handful of herbs brightens the whole dish and makes it look vibrant.
- Sour cream: Creamy, cool, and the perfect contrast to the warm, spicy chili.
Tired of Takeout? 🥡
Get 10 meals you can make faster than delivery arrives. Seriously.
One email. No spam. Unsubscribe anytime.
Instructions
- Start the chili base:
- Heat the olive oil in a saucepan and cook the onion until it turns soft and translucent, letting the kitchen fill with that sweet, savory smell. Toss in the garlic and stir for just 30 seconds so it doesnt burn.
- Brown the beef:
- Add the ground beef and break it apart with a wooden spoon, letting it sizzle and brown evenly. This step builds the meaty, caramelized foundation of the chili.
- Bloom the spices:
- Stir in the tomato paste, cumin, chili powder, smoked paprika, and cayenne, cooking for a minute until the spices smell toasted and fragrant. This wakes up the flavors and makes them cling to the beef.
- Simmer the chili:
- Pour in the chopped tomatoes and kidney beans, season with salt and pepper, and bring everything to a gentle simmer. Let it bubble away uncovered for 20 to 25 minutes, stirring now and then, until its thick and rich.
- Cook the fries:
- While the chili does its thing, bake or fry the fries until theyre golden and crispy. Theyre the sturdy base that holds everything together, so dont skimp on crispness.
- Assemble and melt:
- Spread the hot fries on an ovenproof platter, ladle the chili over them, and scatter the shredded cheddar on top. Slide it into a preheated oven at 200 degrees Celsius for 5 to 7 minutes until the cheese is bubbly and melted.
- Garnish and serve:
- Pull the platter out, sprinkle with spring onions and fresh herbs, and serve immediately while everything is hot and gooey. Pass the sour cream around for anyone who wants a cooling contrast.
 Save
Save One evening, I made a huge batch of chili cheese fries and set it on the coffee table during a game night. We ate straight from the platter with forks, no plates, no pretense, just friends huddled together laughing and stealing bites from each others corners. It wasnt fancy, but it felt like home. That moment reminded me that the best food doesnt need to be complicated, it just needs to bring people together.
How to Keep the Fries Crispy
The secret is timing and temperature. Bake or fry your fries until theyre deeply golden and very crisp, then top them with hot chili and cheese just before serving. If youre making this for a crowd, keep the chili and fries separate until the last possible moment. I learned this the hard way after letting a batch sit too long and ending up with a soggy mess. Now I always assemble right before eating, and the texture stays perfect from the first bite to the last.
Customizing Your Toppings
This dish is a playground for toppings. Ive added pickled jalapeños, crispy bacon bits, diced tomatoes, and even a drizzle of hot sauce depending on my mood. One time I used pepper jack cheese instead of cheddar, and the extra heat was incredible. My favorite addition is a handful of crushed tortilla chips on top for an extra crunch. Dont be afraid to experiment and make it your own, because thats when it gets really fun.
Making It Ahead and Reheating
You can make the chili a day or two in advance and store it in the fridge, which actually deepens the flavors. When youre ready to serve, reheat the chili gently on the stove, cook fresh fries, and assemble everything hot. Ive tried reheating the whole assembled dish, and it just doesnt work, the fries lose their crispness and the magic fades. Keep the components separate, and youll always have a winning plate.
- Store leftover chili in an airtight container in the fridge for up to three days.
- Reheat fries in the oven or air fryer to restore their crispness before topping.
- Freeze the chili for up to a month if you want to prep even further ahead.
 Save
Save Chili cheese fries are one of those dishes that never fail to make me smile. Serve them hot, share them with people you love, and dont worry about the mess.
Recipe FAQs
- → How do I make the chili flavorful?
Sauté onion and garlic before browning the beef to build a rich base. Use tomato paste, cumin, chili powder, smoked paprika, and seasoning to deepen flavor.
- → Can I bake the fries instead of frying?
Yes, baking frozen or homemade fries at 200°C until golden works well and reduces oil use while maintaining crispiness.
- → What cheese works best for melting?
Cheddar cheese melts beautifully, creating a creamy topping, but Monterey Jack or pepper jack are tasty alternatives.
- → How can I add more heat to this dish?
Include cayenne pepper in the chili or top with jalapeños and a drizzle of hot sauce for extra spiciness.
- → Is there a vegetarian option?
Substitute ground beef with plant-based mince or add more beans and corn to keep the hearty texture.
- → How to serve for best presentation?
After baking, garnish with freshly chopped spring onions and cilantro. Serve with a side of sour cream for added creaminess.