 Save
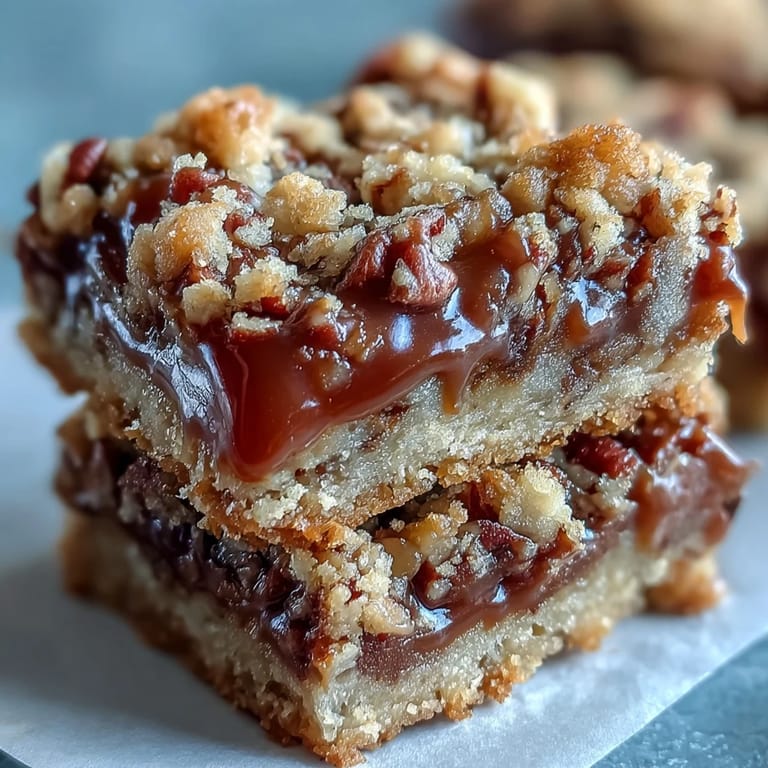
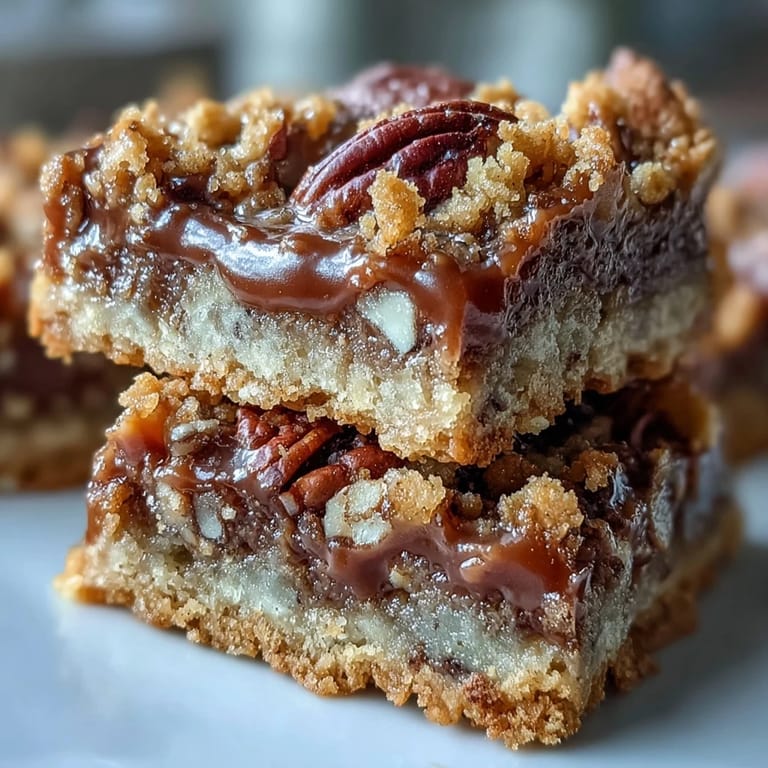
Save The smell of butter and brown sugar mingling in the oven always pulls me straight back to a quiet Saturday afternoon when I needed something sweet but didn't want to fuss with layer cakes or finicky frosting. I pulled out oats, a jar of caramel, and whatever chocolate chips were hiding in the pantry. What came out of the oven that day were these rich, gooey bars that tasted like the inside of a turtle candy, only better because they were warm and the edges had that irresistible crunch. My neighbor knocked on the door just as I was cutting them into squares, and I handed her one still soft from the pan—she came back an hour later asking for the recipe.
I brought a batch to a potluck once, stacked in a simple glass dish with parchment between the layers. They disappeared so fast I barely got one for myself. A friend later told me her kids asked for them by name every time she saw me, and I realized these bars had quietly become my signature without me ever planning it that way.
Ingredients
- All-purpose flour: This gives structure to the crust and topping, creating that tender crumb that holds everything together without turning cakey.
- Rolled oats: They add chew and a subtle nuttiness that balances the sweetness, plus they toast beautifully in the oven.
- Brown sugar: The molasses in brown sugar deepens the flavor and keeps the bars moist even a few days later.
- Granulated sugar: A touch of white sugar helps the topping crisp up and adds clean sweetness to the base.
- Unsalted butter, melted: Melted butter binds the crumb mixture without needing a mixer, and I always use unsalted so I can control the salt level myself.
- Salt: Just a pinch sharpens all the flavors and keeps the sweetness from feeling flat.
- Baking soda: A small amount gives the crust a bit of lift and helps it brown evenly.
- Semi-sweet chocolate chips: They melt into puddles of chocolate that seep into every corner, and semi-sweet keeps things balanced instead of cloyingly sweet.
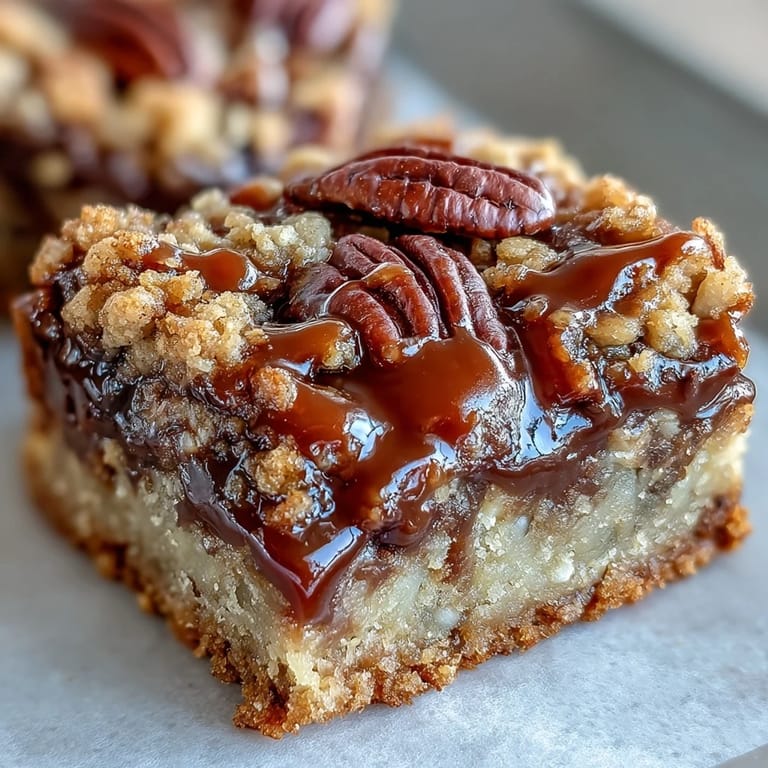
- Chopped pecans: Toasted pecans bring that classic turtle flavor and a satisfying crunch against the soft caramel.
- Caramel sauce: Store-bought works perfectly here, but if you have homemade on hand, even better—it becomes the soul of the bar.
- Heavy cream: Stirring cream into the caramel makes it pourable and keeps it from hardening too much as it cools.
Tired of Takeout? 🥡
Get 10 meals you can make faster than delivery arrives. Seriously.
One email. No spam. Unsubscribe anytime.
Instructions
- Prep the Pan:
- Preheat your oven to 350°F and grease a 9x9-inch pan generously or line it with parchment so the bars lift out cleanly later. I like to leave a bit of overhang on two sides for easy removal.
- Mix the Crumb Base:
- In a large bowl, stir together the flour, oats, both sugars, melted butter, salt, and baking soda until the mixture looks like wet sand. Set aside 1 cup of this crumbly mixture for the topping, then press the rest firmly into the bottom of your prepared pan.
- Par-Bake the Crust:
- Slide the pan into the oven and bake for 10 minutes until the crust just starts to turn golden at the edges. This step sets the base so it doesn't get soggy under all that caramel.
- Warm the Caramel:
- While the crust bakes, combine the caramel sauce and heavy cream in a small saucepan over medium-low heat, stirring constantly until smooth and pourable. Take it off the heat as soon as it's combined.
- Layer Chocolate and Pecans:
- Pull the crust from the oven and immediately scatter the chocolate chips evenly over the hot surface, then sprinkle the chopped pecans on top. The warmth will start to soften the chocolate right away.
- Pour the Caramel:
- Drizzle the warm caramel sauce over the chocolate and pecans, letting it pool and spread into every gap. Work quickly so the caramel stays fluid.
- Add the Crumb Topping:
- Sprinkle the reserved crumb mixture evenly over the caramel layer, pressing down gently so it sticks. This will bake into a golden, crunchy cap.
- Bake Until Golden:
- Return the pan to the oven and bake for 15 to 20 minutes, until the topping is deeply golden and smells like toasted oats and butter. Watch the edges so they don't burn.
- Cool Completely:
- Set the pan on a wire rack and let it cool fully before cutting—at least 30 minutes. The caramel needs time to set, or the bars will be too soft to slice cleanly.
 Save
Save One evening I made a batch and forgot about them on the counter while I answered emails. When I finally remembered and went to cut them, they were perfectly set and sliced like a dream. That's when I learned patience with these bars pays off—they're worth the wait.
Storing and Serving
These bars keep beautifully in an airtight container at room temperature for up to a week, though they rarely last that long in my house. If you want to make them ahead, layer them between sheets of parchment to prevent sticking. I've even frozen them for a month, and they thaw on the counter in about an hour, tasting just as good as the day I baked them.
Variations to Try
I've swapped pecans for walnuts when that's what I had, and the deeper, slightly bitter flavor worked wonderfully. If you like salted caramel, sprinkle a few flakes of sea salt over the caramel layer before adding the crumb topping—it cuts the sweetness just enough. For an extra chocolate kick, drizzle melted chocolate over the cooled bars and let it set before serving.
What You'll Need
You don't need any fancy equipment for these bars, just a 9x9-inch pan, a couple of mixing bowls, and a small saucepan for warming the caramel. A wire rack helps them cool evenly, and a sharp knife makes clean cuts once they're set.
- If your knife gets sticky, wipe it clean between cuts for neater squares.
- Parchment paper makes lifting the whole block out of the pan effortless.
- A silicone spatula is perfect for spreading the caramel without tearing the chocolate layer underneath.
 Save
Save These bars have become my answer to every bake sale, every surprise visit, every craving for something sweet and satisfying. I hope they find a place in your kitchen the way they have in mine.
Recipe FAQs
- → What makes these bars chewy?
The combination of brown sugar, melted butter, and rolled oats creates a tender, chewy texture throughout the crust and topping. As the bars cool, the caramel sets into a soft, chewy layer that binds everything together.
- → Can I use homemade caramel sauce?
Absolutely. Homemade caramel works beautifully and allows you to control the sweetness level. Just ensure it's pourable but not too thin—warm it slightly with the cream as directed for easy spreading.
- → How do I know when the bars are done baking?
The topping should turn golden brown, and you'll notice the caramel bubbling slightly around the edges. The crumb topping will feel set when lightly touched, though the center will still be soft due to the caramel layer.
- → Why is rest time important?
Letting the bars cool completely allows the caramel to firm up properly. Cutting while warm causes the layers to slide and the caramel to ooze out, leading to messy, uneven squares.
- → Can I freeze these bars?
Yes, they freeze exceptionally well. Wrap individual squares in plastic wrap, then store in a freezer bag for up to 3 months. Thaw at room temperature for about an hour before serving.
- → What other nuts work in this recipe?
Walnuts or almonds make excellent substitutes for pecans. Toast them lightly before adding to enhance their nutty flavor. Macadamia nuts also pair wonderfully with the caramel-chocolate combination.