 Save
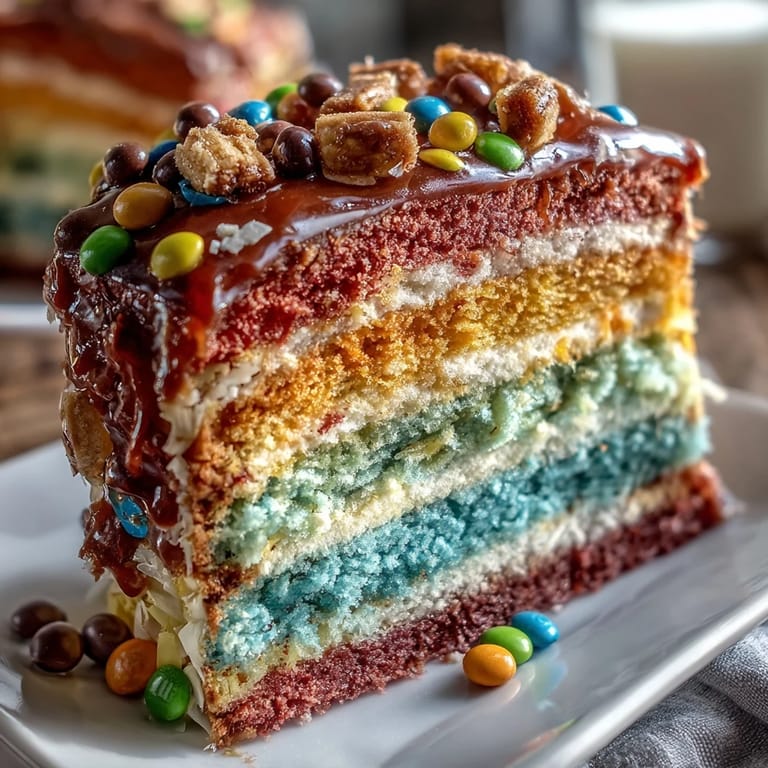
Save My neighbor's daughter burst through the kitchen door asking if we could make something magical for Cinco de Mayo, and I knew exactly what she meant—a cake that didn't just taste amazing but actually surprised you when you cut into it. I'd seen piñata cakes online but they always looked intimidating, so I decided to wing it with rainbow layers and a cavity stuffed with candy that would make everyone gasp. The moment I started dividing the batter into six bowls and watching the gel colors bloom through the white was when I realized this wasn't going to be a typical Tuesday baking project. It became this whole production of planning, layering, and finding just the right candies to hide inside.
I'll never forget watching my neighbor's daughter's face light up when her friends discovered the hidden candy treasure inside their slice—she became the coolest kid at the party instantly. Baking this cake together had turned into something bigger than just following instructions; it was about creating a memory she'd talk about for years. That's when I understood why people make cakes like this, beyond the flavors and textures.
Ingredients
- All-purpose flour: The foundation that holds all those vibrant colors together, so make sure it's fresh and measured properly by spooning and leveling rather than scooping straight from the bag.
- Baking powder and baking soda: This dynamic duo creates that tender crumb that makes people come back for seconds, but don't double them thinking it'll be fluffier—it'll just taste metallic.
- Unsalted butter and sugar: Creaming these together until they're pale and fluffy is the secret handshake that determines if your cake is light or dense, so don't rush this part.
- Room temperature eggs: They blend seamlessly into the batter when they're warm, but cold eggs straight from the fridge will fight you every step of the way.
- Gel food coloring: Gel beats liquid coloring every single time because you don't need as much and it won't thin out your batter or create a weird taste.
- Assorted small candies: Stick to things that won't melt or get weird when sandwiched between layers of frosting—save the chocolate-covered items for another day.
- Powdered sugar frosting: Sifting the sugar before you start might feel tedious, but it's the difference between smooth frosting and grainy frosting that nobody wants.
Tired of Takeout? 🥡
Get 10 meals you can make faster than delivery arrives. Seriously.
One email. No spam. Unsubscribe anytime.
Instructions
- Set up your workspace:
- Preheat the oven to 350°F and grease those pans generously—nothing ruins the surprise faster than a cake that sticks and breaks apart during unmolding. Have everything measured and ready because once you start mixing, things move quickly.
- Build the batter base:
- Whisk your flour, baking powder, baking soda, and salt together in a medium bowl so the leavening agents distribute evenly throughout. This step takes two minutes but makes a real difference in how your cake rises.
- Cream the butter and sugar:
- Beat them together for a solid 3 minutes until it looks light, fluffy, and pale—this is where the air gets incorporated that makes the cake tender. You'll know it's ready when it looks almost like frosting itself.
- Incorporate the eggs gently:
- Add one egg at a time, beating well after each addition so they fully emulsify into the butter mixture. If you throw all four in at once, you risk a broken batter that won't rise properly.
- Alternate dry and wet ingredients:
- Start with flour, then milk, then flour again, ending on flour—this prevents overmixing which is the enemy of tender cake. Mix just until you don't see streaks of flour anymore.
- Divide and color the batter:
- Split the batter into six bowls and add a different gel color to each one, stirring gently until the color is even but not overdone. The batter will look almost neon, which is exactly right.
- Pour and bake carefully:
- If you only have three pans, you'll need to bake in two batches, which means numbering your layers or keeping track of which color is which. Watch the clock closely because even 2 minutes extra can dry them out.
- Cool with patience:
- Let the layers rest in the pans for 10 minutes before turning them out onto cooling racks, which prevents them from breaking while they're still fragile. Completely cool layers are essential for the next steps.
- Create the piñata cavity:
- Use a 3-inch round cutter to punch out the centers of four of your six layers, leaving the top and bottom layers whole to contain the surprise. Work carefully so the edges don't crumble.
- Make the frosting:
- Beat the softened butter until it's really creamy, then gradually add the sifted powdered sugar so it doesn't cloud up into a mess. The milk and vanilla go in at the end to bring everything to spreading consistency.
- Stack with precision:
- Start with your purple layer as the base, frost it lightly, then add the first cut-out layer and keep building toward the center. Each layer should be level and stable so nothing shifts when you add the surprise.
- Fill the hidden center:
- Pour your candies into the cavity created by the stacked cut-out layers, mixing colors and textures so each slice reveals something fun. Don't overfill or the frosting won't seal properly.
- Cap and frost the entire cake:
- Place the final whole layer on top and frost everything generously with a crumb coat first, then a thicker final coat once the crumbs are sealed. The decorations go on while the frosting is still slightly soft.
- Chill before the big reveal:
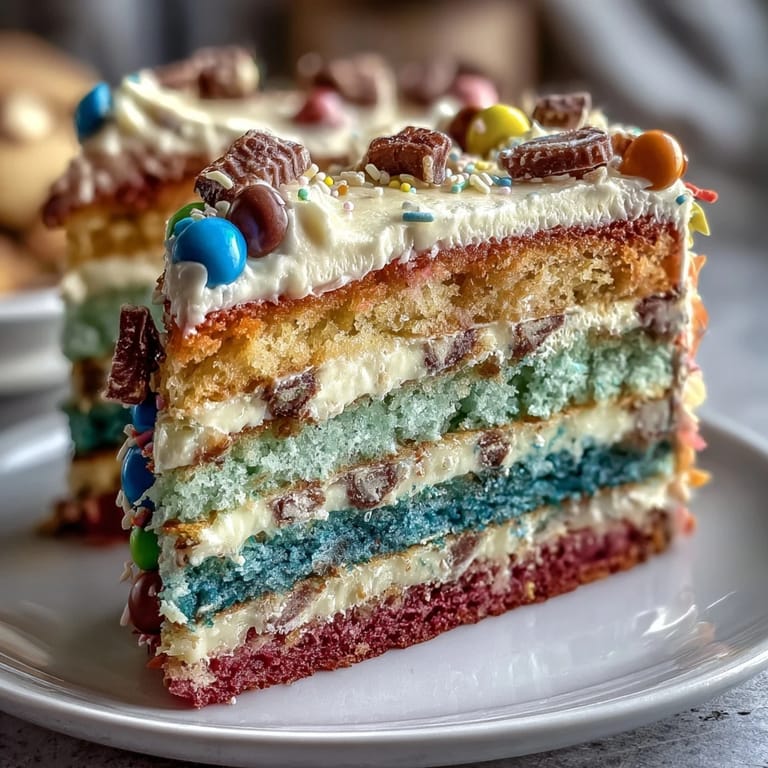
- A 30-minute rest in the fridge sets everything and makes slicing cleaner, so you get those perfect rainbow cross-sections instead of a crumbly mess. This is also when anticipation builds for whoever's about to cut into it.
 Save
Save Watching someone's jaw drop when they see those rainbow layers and then taste the sweet surprise of hidden candy—that's a moment that sticks with you longer than any regular cake ever could. It's the kind of dessert that becomes part of the story people tell about your celebration.
Choosing Your Candy Filling
The candies you pick will set the whole tone of the surprise, so think about what actually works between cake and frosting layers. Mini M&Ms are reliable, gummy bears add a chewy texture contrast, and sprinkles just look festive, but avoid anything chocolate-heavy unless you're serving it immediately. I learned the hard way that caramels get weird and sticky when they're surrounded by frosting, so stick with candies that hold their shape.
Baking in Batches vs. Having Multiple Pans
If you only have three pans like most people, baking in two batches adds 30 minutes to your timeline but doesn't affect the quality at all. The nice thing about having time between bakes is you can make sure each layer is truly cool before moving to the next step. I actually preferred spacing out the baking because it gave me time to clean bowls and organize my workspace without feeling rushed.
Decorating Your Masterpiece
The frosting exterior is your canvas, and you can go as simple or as elaborate as your confidence and energy allow. A smooth frosted cake with a few sprinkles scattered on top is just as beautiful as one covered in colored frosting designs, so don't stress yourself trying to make it perfect. The real star is what's hidden inside anyway, and that's what everyone will remember.
- Chill the cake before frosting for easier handling and neater decoration work.
- Let the frosting soften just slightly before adding decorations so they stick without sliding.
- Remember that imperfect decorating looks homemade and charming, which is way better than stiff and overdone.
 Save
Save This cake is worth making because it transforms a regular Cinco de Mayo party into something guests will talk about long after the party ends. When people's eyes light up at that first slice, you'll know why this cake is worth the little extra effort.
Recipe FAQs
- → How are the colorful layers made?
The batter is divided into six portions and each is tinted with a different gel food coloring before baking individually into separate layers.
- → What candies are best for the filling?
Use small, assorted candies like mini M&Ms, rainbow sprinkles, or gummy bears to create a fun surprise without affecting the cake structure.
- → How do you prepare the cavity for the candy center?
After baking, a 3-inch round cutter is used to hollow out the center of four layers, leaving the top and bottom whole to enclose the candy.
- → Can this cake be adapted for dietary restrictions?
Yes, gluten-free flour can substitute all-purpose flour, and candy selection can be adjusted to avoid allergens as needed.
- → What’s the best way to slice the cake cleanly?
Chilling the cake for at least 30 minutes before slicing firms the layers and frosting, ensuring neat and tidy slices.
- → What tools are needed to make this cake?
Essential tools include 8-inch round pans, an electric mixer, gel food coloring, a 3-inch round cutter, and a wire rack for cooling.